

Chapter 15. Debrief maintainer's guide
Table of Contents
15.1. Installation guidance
15.1.1. System requirements
Table 15.1. Requirements for Debrief
Requirement | Minimum | Recommended |
|---|---|---|
Processor | 800 MHz | 1400 MHz |
Memory | 256 Mb | 1024 Mb |
Java Virtual Machine | JVM 1.5 | As new as possible. JVM 1.5 includes significant performance improvements, particularly in the list processing used extensively within Debrief |
XML Libraries | SAX and DOM support (through the enclosed jaxp.jar and parser.jar libraries) | |
OpenMap libraries (used for plotting NIMA's Vector Map data) | 4.2.1 (through the enclosed openmap.jar library) |
15.1.2. Implementing 'open with' support for DebriefNG
Since Winter 2010, DebriefNG can be opened by on a Debrief data file (rep (Section 16.1, “Replay file format”) or DPF (Section 16.2, “Debrief file format”)). But, first DebriefNG must be associated with files of that file-type, via Windows Explorer. Do this as follows[3]:
-
Open Windows Explorer
-
Navigate to a Debrief
REPfile -
Right-click on the file and select 'Open With'
-
Now browse to the DebriefNG.exe executable, typically contained in the
c:\DebriefNG. You may also wish to select 'Always use this application'. -
Now repeat this process for a Debrief
dpffile , you can select 'Always use this application' - since dpf files aren' used by many applications. Debrief did use thexmlsuffix, but that related to lots of files - so in Oct 2014 we adopted.dpf.
15.1.3. Directory structure
Debrief installs itself into a Debrief NG folder in the top level of your C:\ drive.. Within the Debrief NG folder you will find the DebriefNG executable in the top-level, together with some additional dll files used for optimised graphics (gdiplus.dll), and copy to clipboard (JavaClipboard.dll).
The configuration folder contains details of Debrief's initial settings together with the locations of update download sites.
The features and plugins folders include details of what Eclipse plugins are present (where each feature is actually a group of plugins), together with the plugins themselves. The workspace folder is a default workspace provided for new users. It contains current work projects together with a large volume of metadata representing change history, screen layout and user preferences.
15.1.4. Multi-user Debrief installation
The conventional way of installing Debrief is for each user to have their own copy, maintaining their own sets of plugins and updates (as above). There is an alternate installation scenario, however - for all users to share a common Debrief installation. An advantage of this scenario is that software updates only need to be performed once, at the central location. By default, however, shared installations are troublesome for Debrief - since all users will be looking at a single set of settings - so administrator participation is necessary.
Whilst a number of theoretical solutions exist for this problem, the most reliable solution to emerge is to force Debrief NG to use the workspace in the users own login directory (since each user has a unique login directory). This also overcomes the challenge of new users having to select a workspace before they know what a workspace is.
Thus, the Debrief shortcut (.ini file) has been modified to explicitly indicate that the workspace is in the a folder in the user login area:
-data
@user.home/.DebriefNG
The '.' character before the DebriefNG folder name follows a convention that is normally sufficient to make the operating system make the folder hidden by default.
![[Tip]](images/tip.gif) | Tip |
|---|---|
|
When users are upgrading from older versions of DebriefNG, the application will ignore the last workspace location, and load a new, blank workspace from the new user directory. If the user now closes Debrief the workspace data can be copied from the old location into the new location, which will get read when the application re-opens. |
15.1.5. Centralised software updates
In the Autumn 2009 updates Debrief adopted the Eclipse p2 update mechanism. With this update came support for centralised updates. Centralised updates allow updated Debrief components to be placed at a central location on shared network storage, with individual Debrief installations automatically updating from it.
Start by locating a central shared folder, and creating a Repository folder in it. This is where your Debrief maintainer will unzip Debrief updates. Next, you must tell the individual Debrief installations where the repository is. Do this from the Preferences Install/Update Available Software Sites dialog:
Figure 15.1. Repository location dialog
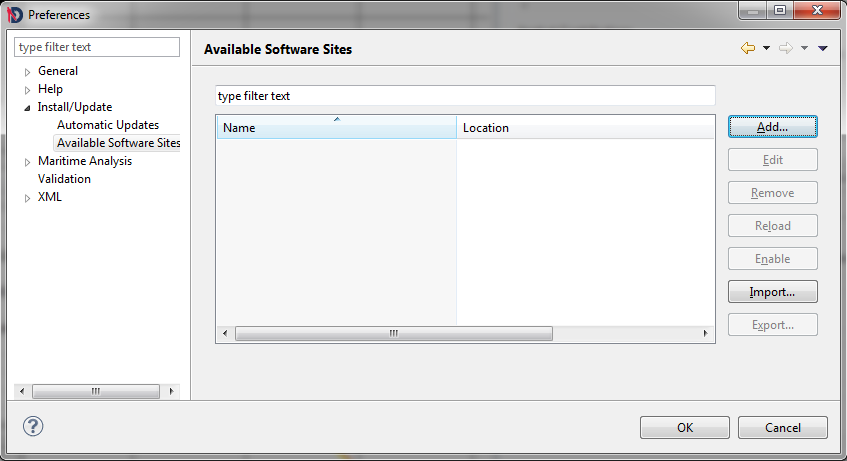
Then, to update a Debrief installation select Check for updates from the Help menu. Note, the Install/Updates section of Debrief preferences also includes options for automatic software updates.
15.1.6. Starting the program
The shortcut placed on the menu actually calls the DebriefNG.exe file found in the startup directory. This application triggers the startup of Debrief, passing to it the parameters contained in the DebriefNG.ini file. This file contains options to select the initial perspective, the memory allocation, and additional files to include on the classpath.
15.1.7. Use of English locale
Note that Debrief fails when on an machine set to a non-English locale, such as French(Canada). The application cannot read data-files correctly, nor can it populate screen editors. The workaround to this problem is to explicitly direct Debrief to startup using an English locale. Do this by launching Debrief with the "-nl en" command parameter. This can be performed either by modifying the shortcut used to start Debrief, or by adding the command parameter to the Debrief.ini configuration file (though this will have to be re-performed after each Debrief update).
[3] Note, across the range of versions of MS Windows a variety of user interface phrases exist. The steps in this process contain the text that will loosely match that which you'll see

